You've searched the best under-sink RO system options, read multiple product pages, and somehow ended up more confused than when you started. Tank vs tankless RO, counter-top RO unit, or undersink water filter? Five stages or three? What even is a GPD rating? It's a lot, and most buying guides don't make it easier when choosing a RO system for the home.
If your concern is the quality of your drinking and cooking water, whether that's taste, lead, PFAS, chlorine, nitrates, or just the fact that you don't fully trust what's coming out of the tap, an under-sink reverse osmosis system is the right RO filtration system.
It removes more contaminants than pitcher filters, refrigerator filters, or standard carbon units. It's the gold standard for point-of-use filtration, and it sits out of sight under your sink. Still confused about how to start choosing an RO system? Here is a walkthrough guide you must read.
|
Key Takeaways:
|
Know Your Water Before You Buy Anything
Most buyers also end up with a system that's either more than they need or not quite right for their situation. What's in your water determines which system you actually need, so this is worth ten minutes of your time before you spend a few hundred dollars.
-
If you're on city water, your utility publishes an annual water quality report. Health Canada, through the Federal-Provincial-Territorial Committee on Drinking Water, sets the Guidelines for Canadian Drinking Water Quality that utilities follow. You can find your local report online by searching your city's name and "water quality report." Pay attention to lead (which is introduced by aging pipes, not the treatment plant), chloramines, and any mention of PFAS or emerging contaminants.
-
If you're on well water, a report won't help you; you'll need a certified lab test. Priority contaminants for well water are nitrates, arsenic, iron, and bacteria.
Beyond the chemistry, note three practical numbers before you buy anything:
-
Your water pressure: 50–80 PSI is ideal for RO. You can check this with an inexpensive pressure gauge on the cold water line under your sink.
-
Your TDS baseline: a TDS meter (costs $10–$20) tells you how many dissolved solids are in your tap water, giving you a reference point to measure your RO system's performance against.
-
Your cabinet dimensions: measure depth (front to back), width, and height before you start shopping. This becomes critical when choosing between tank and tankless systems.
Tank vs. Tankless: The Most Important Decision You'll Make
Every other choice, cost, size, flow rate, and maintenance depend on the tank or tankless type.
-
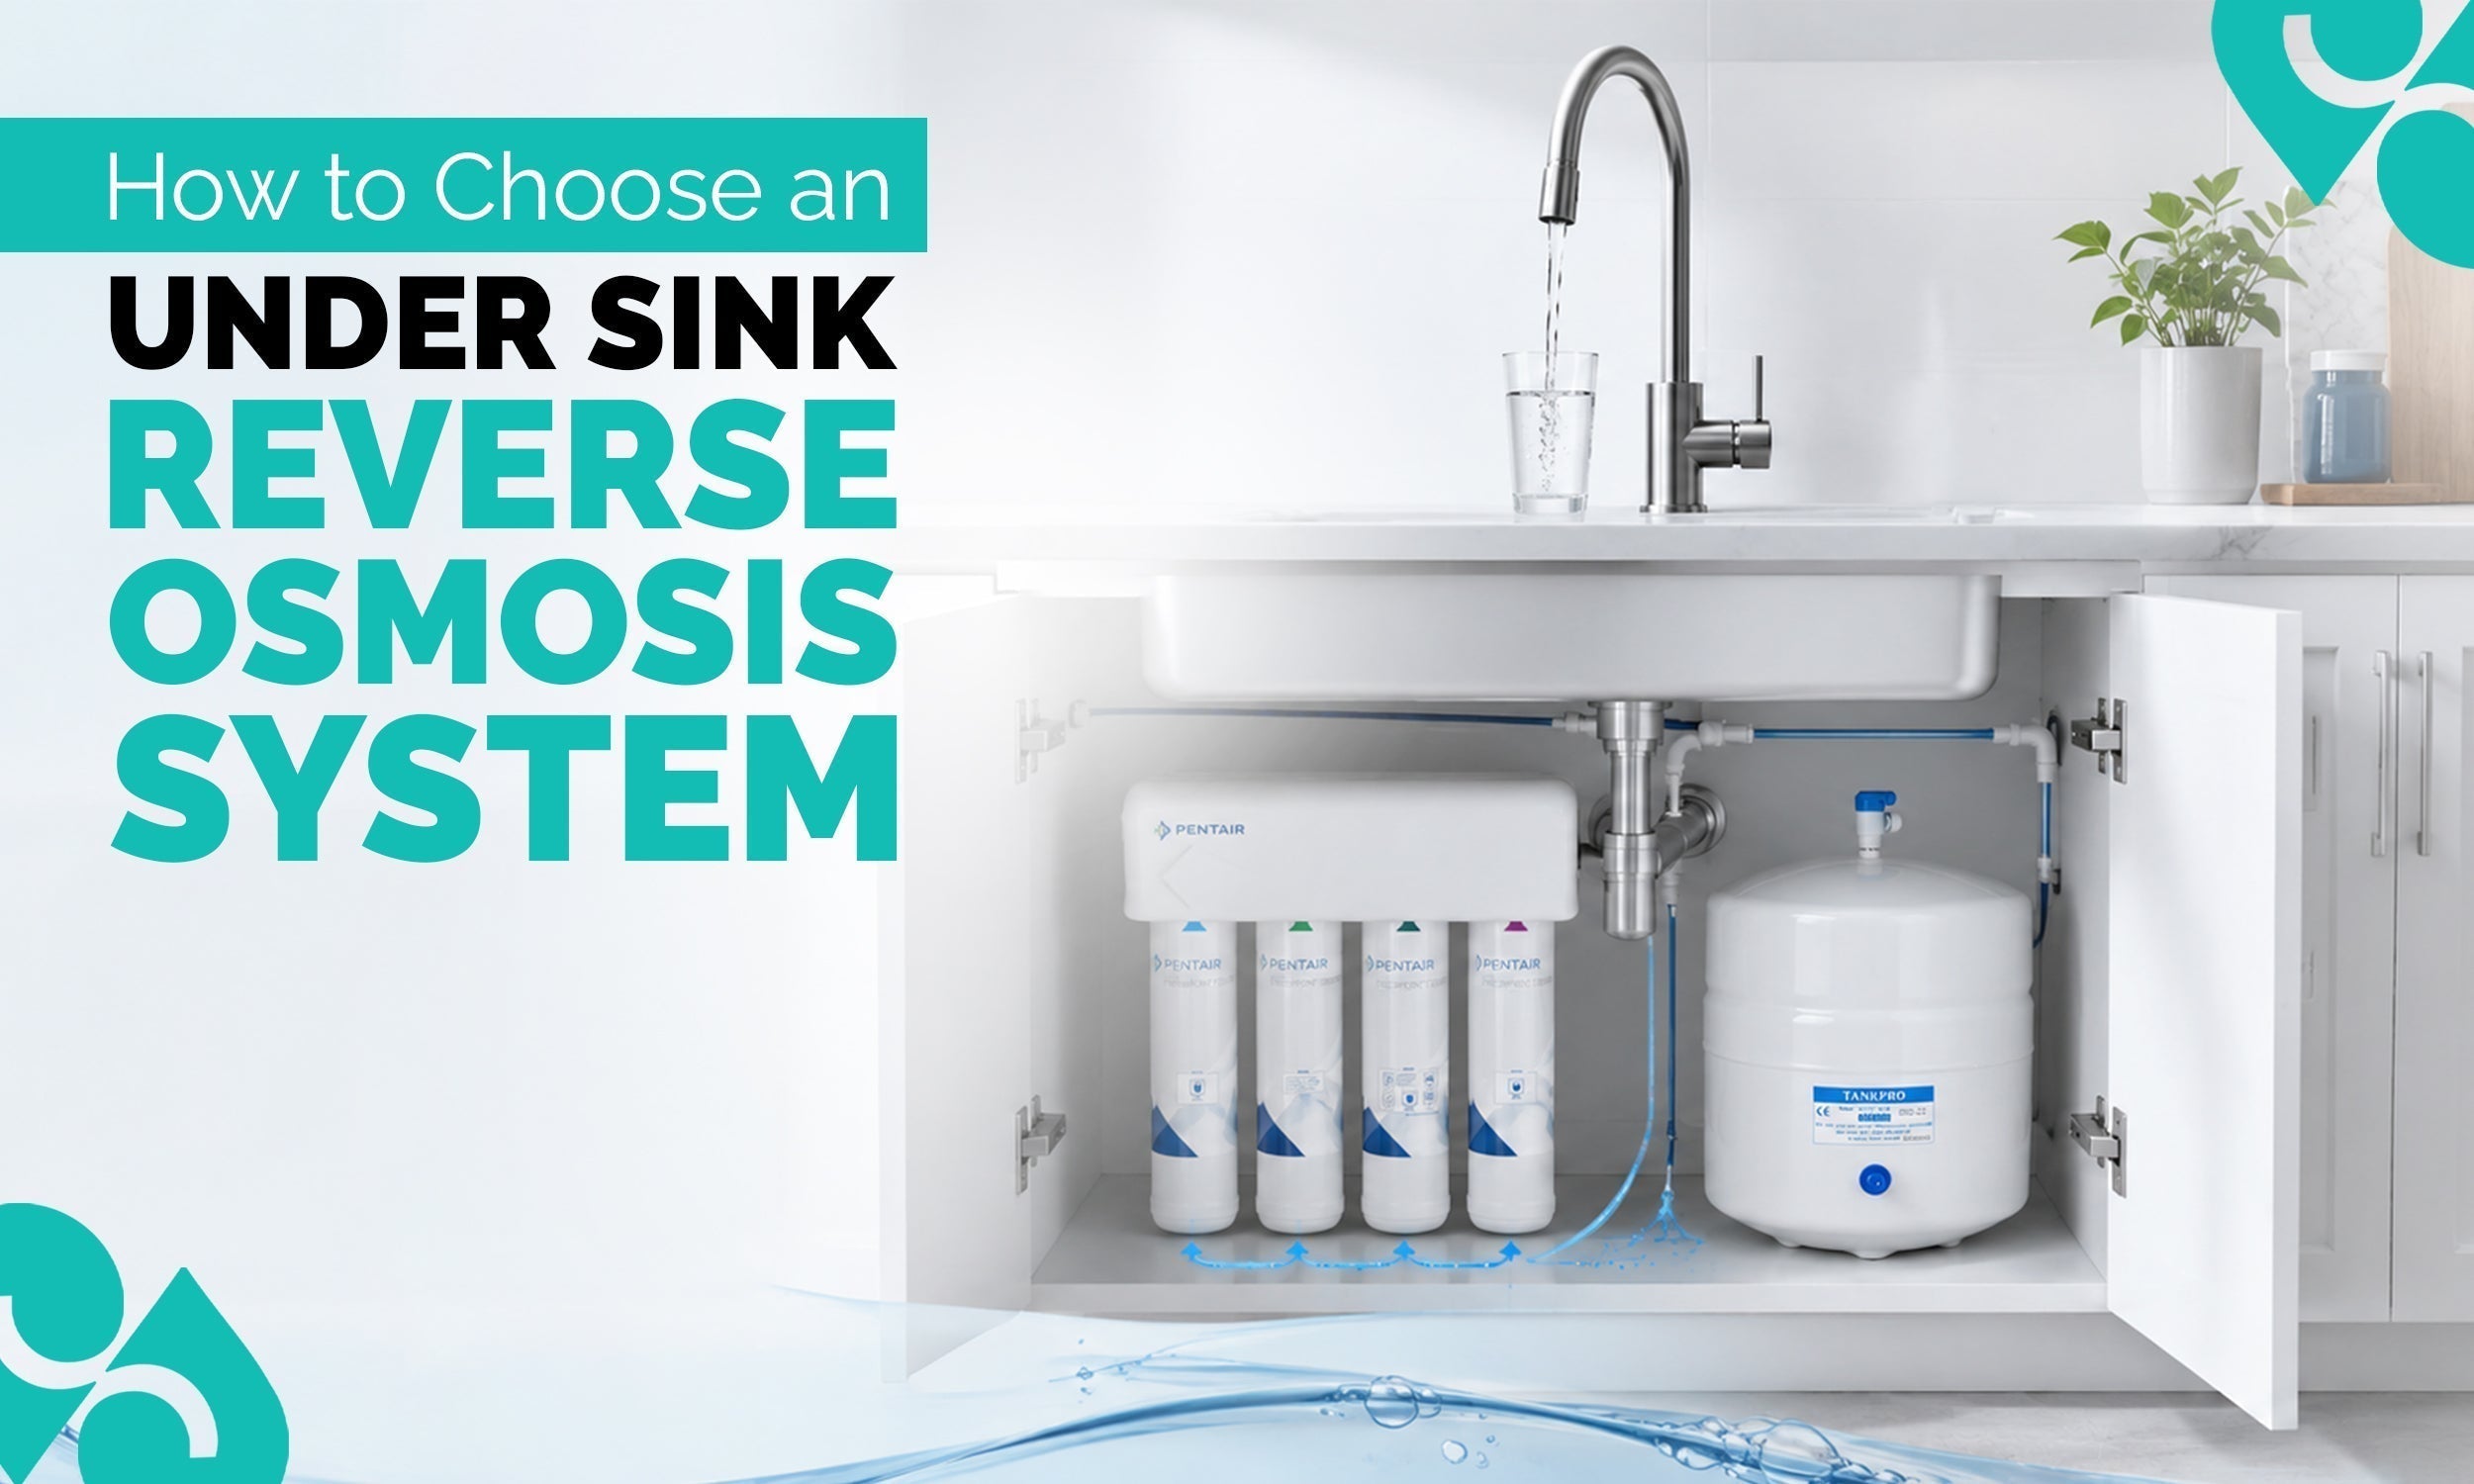
Tank-based systems store pre-filtered water in a pressurized bladder tank, typically holding 1.5 to 3 gallons, so filtered water is ready the moment you open the tap.
-
Tankless systems filter are on-demand water filters. When you turn on the faucet, water is purified in real time with no storage involved.
The right choice depends on your household size, available cabinet space, daily water usage, and how much you want to spend upfront.
Tank-Based RO Systems
Tank systems work by slowly filling a pressurized storage tank between uses, so when you turn on the faucet, you're drawing from a ready supply of filtered water. They're the more established design, widely available, well-understood, and straightforward to install and maintain.
Upfront cost: $150–$350.
Filtration stages: typically 3–5.
GPD range: 50–75 gallons per day.
Annual filter cost: roughly $50–$100.
The main practical tradeoff is space: the storage tank is typically 10–12 inches in diameter and around 15 inches tall. It takes up a meaningful portion of your under-sink cabinet, and if your cabinet is shallow or already crowded, that's a real constraint. Measure before you buy.
Some users notice a slight taste difference if water sits in the rubber-lined bladder for extended periods. A good post-carbon polishing filter addresses this almost entirely. For the majority of households, smaller families, budget-conscious buyers, or anyone with adequate under-sink depth, a tank-based system does everything it needs to do.
Best for: smaller households (1–3 people), budget buyers, and homes with standard under-sink cabinet space.
Tankless RO Systems
Tankless systems filter water on demand, producing purified water the moment you open the tap without storing anything between uses. The design is more compact, many models are wall-mounted inside the cabinet, and the flow rates are significantly higher than those of tank systems.
Upfront cost: $300–$700+
GPD range: 400–1,600
Annual filter cost: roughly $80–$150.
The efficiency advantage is real: modern tankless systems often achieve a 1:1 waste ratio (one gallon to drain for every gallon produced), compared to 3:1–5:1 for older tank designs. They also require a power outlet under the sink, which is worth confirming before purchase.
Some buyers choose tankless specifically because they prefer not to have water sitting in a storage tank. For larger households, high-demand kitchens, or anyone with limited cabinet depth, the higher upfront cost is often justified by the performance and space savings.
Best for: larger households (3+ people), high water demand, compact cabinet spaces, buyers who prefer on-demand filtration.
Side-by-Side Comparison
|
Feature |
Tank-Based |
Tankless |
|
Upfront Cost |
$150–$350 |
$300–$700+ |
|
Annual Filter Cost |
$50–$100 |
$80–$150 |
|
Under-Cabinet Space |
Moderate–Large (tank required) |
Compact (wall-mount option) |
|
Flow Rate (GPD) |
50–75 |
400–1,600 |
|
Waste Ratio |
3:1–5:1 |
1:1–2:1 |
|
Remineralization Option |
Yes (add-on stage) |
Yes (add-on stage) |
|
DIY Install Difficulty |
Easy (no power required) |
Easy–Moderate (power outlet needed) |
|
Best For |
Small households, budget buyers |
Large households, limited space, high demand |
Note: The prices may change depending on factors like your water quality, plumbing requirements, and water usage. Check our complete guide on how much a water filter can cost you in Canada. Also, discuss with the service provider before you make a final budget. Contact us for more details or get an assessment today.
How Many Filtration Stages Do You Actually Need?
More stages do not automatically mean better filtration. What matters is whether the right stages are present for your specific water. A well-configured 4-stage system will outperform a bloated 7-stage system with redundant or irrelevant filters.
The four core stages every RO system should have are: a sediment pre-filter, a carbon pre-filter (which protects the RO membrane from chlorine damage, this is essential), the RO membrane itself, and a post-carbon polishing filter. Everything beyond that is an optional upgrade that may or may not be relevant to your situation.
3–4 Stage Systems
In a 3-4 stage RO filter system, a sediment pre-filter removes particulates, and the carbon pre-filter handles chlorine and chloramines. The RO membrane does the heavy lifting, and the post-carbon polishing filter refines taste before the water reaches your glass. Together, these four stages address lead, arsenic, fluoride, nitrates, PFAS, chlorine, and overall TDS.
For the majority of homeowners on city water with standard contamination concerns, a 3–4 stage system covers everything that needs to be addressed. They're cost-effective, easy to maintain, and widely available in both tank and tankless configurations. If you're on city water and your annual CCR doesn't flag anything unusual, this is likely all you need.
Best for: city water users, standard contamination profiles, buyers prioritizing simplicity and value.
5–7 Stage Systems
Additional stages in a 5–7 stage system typically include one or more of the following: a remineralization filter, UV sterilization, or an alkaline filter. These are genuine upgrades for the right situation, but they're not universally necessary.
UV sterilization is worth adding if you're on well water or have any bacterial concern. It eliminates microorganisms that an RO membrane alone may not fully address. A remineralization filter adds calcium and magnesium back into the purified water, improving taste and raising pH slightly. More stages also mean more filters to track and replace, and higher annual maintenance costs.
Best for: well water users, anyone with bacterial concerns, buyers who prioritize taste optimization or mineralized water.
Remineralization: Do You Need It?
RO filtration removes virtually everything, including naturally occurring minerals like calcium and magnesium. For most people, this is completely fine. Dietary minerals come primarily from food, not water, and pure RO water is recognized as safe by every major health authority.
Some people notice that highly purified RO water tastes flat or slightly acidic compared to tap or bottled water. A remineralization filter adds small amounts of calcium and magnesium back into the water, improving taste and nudging the pH up slightly.
It's a preference upgrade, worth considering if you're a coffee or tea enthusiast (mineral content genuinely affects extraction quality) or if you simply prefer the taste of mineralized water. Remineralization is not medically necessary, as the minerals from water add a very minute amount to your daily dietary requirement. If taste isn't a concern for you, skip it.
If your water is hard:
If you're in a hard water area, your filters and RO membrane will wear faster than the standard manufacturer's schedule suggests. High mineral content accelerates build-up, and replacement intervals that work for soft water homes may not be adequate for yours.
The most practical solution is to pair your RO system with a water softener installed upstream. The softener handles calcium and magnesium hardness before water ever reaches the RO unit, extending membrane and filter life significantly.
This is the standard setup for hard water homes, and it's one of the more impactful things you can do to protect your long-term investment. If you're in a known hard water area and skipping the softener, plan for more frequent filter replacement and budget accordingly.
How Much Flow Rate and GPD Do You Actually Need?
GPD, gallons per day, tells you how much filtered water a system can produce in 24 hours under ideal laboratory conditions. The word "ideal" means the actual output typically runs at 50–75% of the rated figure, and cold water (which is what most homes have running through their pipes in winter) reduces output further still.
Use this as a practical guide:
-
1–2 people: 50 GPD is sufficient for drinking and cooking needs.
-
3–4 people with regular cooking: 75 GPD is comfortable.
-
Large families or heavy users: 400+ GPD tankless systems are the right tier.
GPD and flow rate are related but not the same thing. Flow rate is how fast water comes out of the faucet; GPD is how much the system can produce over the course of a day. Tankless systems deliver water on demand at a higher immediate flow rate. Tank systems draw from stored water, so tap flow feels fast, but the tank itself refills slowly.
If your household water pressure is below 40 PSI, a booster pump makes a meaningful difference to both output and efficiency. Many tankless systems include a built-in pump, which is a genuine advantage for lower-pressure homes. City water typically runs 40–80 PSI; well water pressure varies more widely and should be measured directly.
Never treat manufacturer GPD ratings as a guaranteed output. They're a comparative benchmark, not a real-world promise.
Check Your Water Pressure, Cabinet Space, and Faucet Setup Before You Buy
Practically, a few things are realized only on installation day, with a new system sitting on the floor and a cabinet that won't accommodate it. So, you can avoid regret just by reading the following tips. None of these checks is complicated, but skipping them is how you end up returning a system or making do with an awkward workaround.
Minimum PSI Requirements
RO systems push water through a semi-permeable membrane, and that process requires adequate pressure to work properly. The ideal range is 60–80 PSI. Below 40 PSI, output drops off significantly, and the system will produce water slowly and may underperform on contaminant reduction.
If your pressure is low, you have two options:
-
A non-electric permeate pump, which improves system efficiency without adding pressure directly.;
-
An electric booster pump actively increases the pressure feeding the membrane. Tankless systems often include a built-in pump, which makes them a practical choice for lower-pressure homes.
To check your pressure: attach a simple pressure gauge to the cold water supply valve under the sink. They're inexpensive and available at most hardware stores.
Under-Cabinet Space and Tank Sizing
Measure your under-sink cabinet before shopping, not after. You need the depth (front to back), width, and height. Tank-based systems require space for both the filtration unit and the storage tank, which is typically 10–12 inches in diameter and around 15 inches tall. If your cabinet is shallow or shared with a garbage disposal or cleaning supplies, the tank may not fit comfortably.
Tankless systems are considerably more compact. Many are designed to wall-mount inside the cabinet, keeping the floor clear. If space is limited, this alone can settle the tank vs. tankless question.
Take photos of your under-sink space before you start shopping and check product dimensions directly against your measurements. The time spent doing this is far less than the time spent on a return.
Air Gap vs. Non-Air Gap Faucets
Most RO systems come with a dedicated faucet that you install through the countertop or sink deck. These come in two varieties: air-gap faucets, which have a visible break in the drain line to prevent backflow and are required by plumbing code in some municipalities; and non-air gap faucets, which are simpler, quieter, and the more common choice.
For most homes, a non-air gap faucet with a check valve on the drain line is perfectly adequate. If you're in an area where an air gap is code-required, it's worth a quick check before purchasing. Your local building department or a plumber can confirm this in a few minutes.
Don't Want to Drill? Here Are Your Options
Many homeowners are reluctant to drill a second hole in their countertop for the RO faucet, especially renters or anyone in a kitchen they don't want to modify. There are practical workarounds:
-
Faucet diverter or T-adapter: attaches to your existing cold water line and routes RO water through a separate valve, no new hole required.
-
Three-way faucet: replace your existing kitchen faucet with one that has a built-in third outlet for filtered water.
-
Modern tankless systems with integrated faucets: some designs route filtered water through the system's own dedicated tap without requiring any counter drilling.
One note of caution is that routing RO water through your main kitchen faucet (the one you use for dishes and washing) will cause filters to exhaust faster, since you're filtering far more water than you're drinking.
Running RO Water to Your Refrigerator
If your refrigerator has a water dispenser or ice maker, you can extend the RO output line to feed it directly. This gives you RO-quality water and ice from your fridge at no additional system cost, just a length of tubing run from under the sink. Most RO systems support this easily, and it's best done at installation time, though it's straightforward to add later as well.
What to Do With RO Wastewater?
Traditional RO systems send 3–5 gallons to drain for every gallon produced. Modern systems are much more efficient; many reach 1:1 or 2:1 ratios, but some waste is inherent to the filtration process.
One practical option can be to redirect the drain line via rubber tubing to water your garden or houseplants. RO wastewater is concentrated in minerals but not harmful to most plants, and it works best when the garden or container is positioned lower than the sink. It's a simple, low-effort way to reduce water waste. Avoid using it on salt-sensitive plants.
Know What You're Really Paying Before You Commit
The price tag on the product page is only one of three numbers that matter. To understand what an RO system actually costs, you need to look at the upfront purchase price, annual maintenance, and long-term savings against bottled water. Buyers who understand all three make better decisions and have fewer surprises six months in.
Upfront Cost
Tank-based systems typically run $150–$350. Tankless systems start around $300 and go up to $700 or more, with premium tankless units featuring smart monitoring or high GPD output reaching $500–$1,000.
Within the tank-based category, the price difference between lower-output (24–36 GPD) and mid-range (50–75 GPD) systems is usually modest; go for the higher GPD unless you're on an extremely tight budget. For tankless, the jump from entry to premium typically reflects improvements in GPD capacity, waste efficiency, build quality, and smart features like app-based monitoring or filter life alerts.
Annual Filter and Membrane Replacement
This is where the ongoing cost adds to the total cost of a system. A realistic annual maintenance schedule looks like this:
-
Sediment and carbon pre-filters: every 6–12 months ($20–$50 each)
-
RO membrane: every 2–3 years ($30–$60)
-
Post-carbon polishing filter: every 12 months ($15–$30)
-
Remineralization filter (if applicable): every 12 months ($20–$40)
Total annual maintenance typically runs $50–$150, depending on your system and water quality. Hard water homes will replace filters more frequently.
One important pre-purchase check is that some manufacturers design proprietary filter housings that only accept their own branded filters. This creates long-term dependency if filters become expensive, go out of stock, or the brand discontinues a product line; you're stuck.
Before committing to any system, confirm that it accepts standard industry filter sizes that can be sourced from multiple suppliers.
How Long Does the System Itself Last?
With regular maintenance, an under-sink RO system should last 10–15 years. The filters and membrane are the consumable components, and the housing and fittings are durable.
Systems that accept standard-size filters from third-party suppliers are the safer long-term investment: you're not dependent on a single brand staying in business, keeping stock, or holding prices steady.
The single biggest factor in how long your system lasts is maintenance compliance. A neglected system, one with overdue filter changes or a membrane running well past its service interval, will underperform and may degrade faster. Follow the schedule.
Renting vs. Buying
Some brands offer rental or service subscription options. A monthly fee covers the system, installation, and annual maintenance, with no upfront cost and no DIY servicing. If you're renting a home, want to avoid maintenance entirely, or simply prefer a fully serviced arrangement, this can make sense.
The tradeoff is long-term cost: if you stay in the home for more than three years, ownership almost always works out cheaper. Buying makes the most sense for homeowners who are comfortable with basic annual maintenance and plan to be in the home for the long term.
Look for Certifications That Actually Matter
A brand can print any claim it wants on a product page. NSF/ANSI certifications provide independent verification that a system actually performs as claimed. Certification shows that the contaminant reduction has been thoroughly tested, that materials are safe, and that the product meets established performance standards.
Without certification, the brand's claims are self-reported and unverified. Here are the certifications worth looking for:
-
NSF/ANSI 58: the core RO standard. Verifies contaminant reduction performance and material safety. This is the baseline; any serious RO system should have it.
-
NSF/ANSI 42: covers aesthetic improvement: taste, odor, and chlorine reduction.
-
NSF/ANSI 372: verifies that materials used in the system's construction are lead-free.
-
NSF P473: specific to PFAS reduction. If PFAS is a concern based on your water report, look for this one specifically.
-
WQA Gold Seal: an alternative third-party certification that some brands hold in place of NSF. It's credible and worth recognizing.
If a brand claims NSF certification, verify it yourself at nsf.org by searching the brand or product name and seeing product listings. Some manufacturers claim compliance with NSF standards without holding actual independent certification, a meaningful distinction.
Watch Out for Proprietary Filter Lock-In
Some manufacturers design filter housings that physically only accept their own branded filters. The short-term experience is fine; the long-term risk is that you become entirely dependent on that brand's supply chain and pricing.
Users have reported real problems with this, including extended waits for replacements, price increases with no competitive alternative, and stranded systems when a product line is discontinued.
Buyers should look for systems using standard 10-inch or other industry-standard filter sizes that accept third-party replacements. Before buying, ask directly: "Can I use non-branded filters in this system?" If the answer is no, factor the long-term filter cost and supply risk into your decision.
How to Verify a Certification Claim Yourself?
Go to NSF’s Certified Products and Systems category, search by company name or product name, and look for the specific standard, for example, NSF/ANSI 58 for RO performance.
If the product doesn't appear in the database, the certification claim is likely self-reported rather than independently verified. This takes about two minutes and gives you real confidence in what you're buying. Don't skip it.
Installation: Can You Do It Yourself?
For most homeowners, yes, and it typically takes 1–2 hours with basic hand tools. The process involves shutting off the cold water supply under the sink, connecting the feed line to the supply valve, mounting the filtration unit, installing the dedicated faucet (or setting up a diverter if you're not drilling), connecting the color-coded tubing, and running the drain line.
Most modern systems are designed for DIY installation, with color-coded connections and clear instructions. The first time you use the system, flush it for the first 1–3 tank fills as directed; the water may look cloudy or slightly discoloured initially. This is a normal part of the break-in process, not a defect.
Tankless systems follow the same basic process but also require a power outlet under the sink; confirm this is available before purchasing.
If you're renting, check your lease before drilling anything. A countertop RO system is a practical alternative for renters who can't or don't want to modify plumbing.
Our Recommended Under-Sink RO Systems
At Illi water, our experts have selected based on the criteria covered throughout this guide: NSF certifications, waste efficiency, filter availability, real-world value, and verified performance. Each pick is tailored to a different buyer profile, so regardless of your budget, household size, or setup, there's a relevant option here.
|
Product 1 |
Product 2 |
Product 3 |
Product 4 |
Tips to Get More Out of Your RO System From Day One
Installing the system is the easy part. Getting the most out of it over the years is where a few practical habits make a real difference. These are the things that don't appear in the manual, tips from people who've owned these systems and figured them out through experience.
Pair With a Water Softener If You Have Hard Water
This is the single most impactful upgrade for hard water homes, and it's something many buyers wish they'd known about before purchasing. A water softener installed upstream removes calcium and magnesium before water ever reaches your RO system, significantly extending the life of your filters and membrane.
Without it, hard water homes may find themselves replacing filters twice as often as the manufacturer's schedule suggests. The softener handles hardness; the RO handles everything else. They serve different purposes and work best together.
Always Keep a Spare Set of Filters on Hand
Several RO owners have reported being caught short when filters needed replacing, and some brands have had 6+ week waits on replacement stock. Once your system is installed and working, order a spare set of filters so you're never left without them.
Many modern systems include LED filter life indicators. These typically track time elapsed, not actual water quality. Use them as a prompt, but follow the manual schedule and use a TDS meter as your real performance check.
Use a TDS Meter to Monitor Performance
A TDS meter is a simple, inexpensive tool, typically $10–$20, that measures the concentration of dissolved solids in your water. Test your tap water before installation to establish a baseline, then test the RO output after setup. A fully functional RO system should reduce TDS by 85–99%.
Over time, if your TDS reading starts climbing back toward tap water levels, it's an early warning that the membrane is due for replacement, often before any taste difference is noticeable. It's one of the most practical diagnostic tools you can own as an RO user.
Don't Chase a Zero TDS Reading
If your system includes a remineralization filter, your post-filter TDS reading won't be zero; it'll typically read somewhere around 50–80 ppm. This is correct and intentional. The calcium and magnesium added back by the remineralization stage contribute to taste and a small amount of dietary mineral content.
If you see this reading and assume something is wrong with the system, know that it isn't. A slightly increased TDS after a remineralization stage is the filter working as designed.
Run an RO Line to Your Refrigerator
If you didn't extend the RO output line to your refrigerator at installation, it's an easy upgrade to add later. A length of tubing runs from the system's output to the fridge's water line, giving you RO-quality water and ice throughout the kitchen. It costs very little and takes less than an hour to add.
Redirect Wastewater to Your Garden
RO wastewater is mineral-concentrated but not harmful to most plants. Running the drain line via rubber tubing to a garden or set of outdoor plants, positioned lower than the sink, so gravity does the work, is a simple way to reduce the system's overall water waste. Several users have adopted this as standard practice. Avoid using the runoff on salt-sensitive species; for most gardens, it's perfectly fine.
Frequently Asked Questions
How often do I need to replace RO filters?
Sediment and carbon pre-filters should be replaced every 6–12 months. The RO membrane typically lasts 2–3 years. The post-carbon polishing filter needs replacing every 12 months, as does a remineralization filter if your system has one. Hard water areas will require more frequent replacement across the board. Many systems have LED indicator lights, but these track time rather than actual water quality. Use them alongside a TDS meter and follow the manufacturer's schedule for a complete picture.
Does RO remove beneficial minerals?
Yes, RO filtration removes virtually everything, including calcium and magnesium. For most people, this is not a concern, as the major portion of their dietary minerals comes from food, not water. If you prefer mineralized water for taste reasons or personal preference, a remineralization filter stage adds small amounts of calcium and magnesium back into the filtered water. It's an optional upgrade, not a health requirement.
Can I install an RO system myself?
Yes, for most homeowners. Installation takes 1–2 hours with basic hand tools. Most systems use color-coded tubing and come with clear instructions. The core tasks are connecting the feed line to the cold water supply, mounting the unit, installing the dedicated faucet or setting up a diverter, and running the drain line. Tankless systems also require a nearby power outlet. If you'd rather not do it yourself, a plumber can typically complete the installation in under an hour.
What water pressure do I need?
The ideal range is 60–80 PSI. Below 40 PSI, output will be slow, and efficiency will drop. Check your pressure with a simple gauge on the cold water supply valve under the sink. If pressure is low, a booster pump or permeate pump will improve performance meaningfully. City water typically falls in the acceptable range; well water pressure varies more widely and is worth measuring directly.
How much water does an RO system waste?
Older systems waste 3-5 gallons for every gallon produced. Modern efficient systems achieve ratios of 1:1 or 2:1, which is a significant improvement. The wastewater itself isn't toxic; it's simply water with a higher concentration of the minerals removed in filtration. To minimize waste, choose a system with a high efficiency ratio, and consider redirecting the drain line to water your plants.
Is RO water safe to drink daily?
Yes. RO water is recognized as safe by the CDC and public health authorities worldwide. The concern sometimes raised about mineral depletion is not supported by evidence at the quantities involved in drinking water; your dietary mineral intake from food is far more significant. If you prefer mineralised water for taste or personal preference, a remineralization stage is a simple and widely available add-on.
The Bottom Line: Which RO System Is Right for You?
There's no single right answer, but after reading this guide, you have everything you need to find the right answer for your home.
Here's a simple framework to close it out:
-
Hard water area? Plan for an RO and water softener combination. The softener protects the system; the RO protects your water quality.
-
Small household, limited budget? A 4-stage tank-based system at 50 GPD covers everything you need for drinking and cooking water. Simple, reliable, cost-effective.
-
Larger household or compact cabinet? A tankless system at 400+ GPD gives you the flow rate and the space savings. The higher upfront cost is usually justified.
-
Renting or can't drill? Look at tankless systems with diverter options, or consider a countertop RO as a genuine alternative that requires no plumbing modifications at all.
No system is perfect for every household. The right choice is the one that fits your actual water quality, your household size, your budget, and your cabinet. Use our comparison table as your reference point, check your PSI and cabinet dimensions before you order, verify certifications at nsf.org, and confirm that the filters are available from more than one source.
That's it. You're not choosing between hundreds of options anymore; you're choosing between two or three systems that actually fit your situation. That's a much easier decision to make. And if there’s still any confusion. This quick system quiz by illi water can help you find the right system for your needs.


